Valve Calibration
Introduction
The D2 dispenser is supplied with a calibration table for the supplied valves at a given dispense pressure.
However, it is possible that you may wish to create your own calibration to suite your fluid type and you may also wish to use a different dispense pressure.
Some combinations of fluid types and plate types can force you to use a lower dispense pressure than the default pressure. For example, if you use PCR plates you might want to consider lowering the dispense pressure to 150millibar so as to avoid splashbacks from the V shaped base of the well.
In other scenarios, you might want to increase the dispense pressure, for example if you have a highly viscous fluid you might need to dispense at 1bar or higher to ensure that the fluid is ejected correctly and does not form a droplet.
Calibration can be performed either manually, or automated. Manual calibration method is done by following the software calibration procedure that will guide you through performing dispenses of varying number of shots and varying valve open time. The dispenses are captured in a small vessel which is then weighed and the mass value is entered into D2 software. The automated calibration procedure is exactly the same, however, the dispense shots are performed directly into a vessel that is sat on the stage of a balance. The software will communicate and control both D2 and the balance which allows the user to walk away until the procedure is complete (roughly 30mins).
Principle of Operation
It is helpful to understand the functional principle of the D2 dispenser, in order to better understand how the calibration works.
D2 is a pressure backed, non-contact dispenser. The fluid is held at a stable pressure behind a valve. The valve is opened for a period of time which allows the pressure to eject a shot of the fluid.
Assuming that all other variables remain fixed, the valve open time can be used to precisely and accurately control the dispensed volume.
Of course, in reality there are many variables that control the dispensed volume, such as:
- Valve type/size - F. Gyger AG supports a wide range of valve types that have different valve nozzle diameters a range of valve stroke lengths.
- Fluid type - different fluids can require their own fluid calibration to be dispensed accurately
- Fluid container type - e.g. bottle vs syringe
D2’s software allows the user to create and save calibrations for all the different configurations and use cases that they require.
The software will maintain a library of the calibrations, when you wish to dispense a given fluid type you can select and activate the appropriate calibration on to any of the valve channels you wish.
Software User Interface
The following screenshot shows the calibration tab of the user software.

The main points to note are as follows:
- Active tab - define which calibration is set to be active for a given valve number
- Library tab - the list of all calibrations that are available for your D2
- Calibration Editor tab - create new and edit existing calibrations by performing a sequence of weighed dispenses
Calibration Active View
This tab shows the current selected/active calibrations that will be used on the D2 valve channels. You can click the ID to open and view the calibration in the editor.
Calibration Library View
The calibration library view provides a list of all the available calibration types for your D2. You can see key details of the calibration such as the fluid name, pressure, last modified date and any notes. In addition, you can click the ID to open and view the calibration in the editor
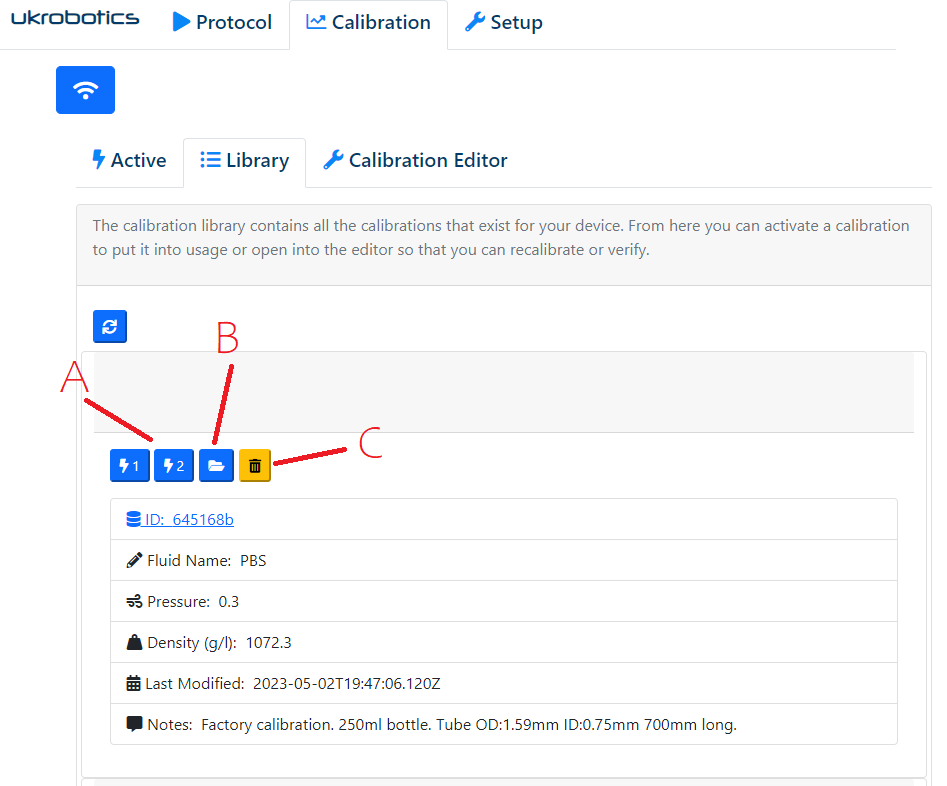
button menu:
- A - the buttons will select the calibration to be active on the given valve number, 1 or 2 as shown
- B - open the calibration in the calibration editor so you can view and re-calibrate if required
- C - delete this calibration
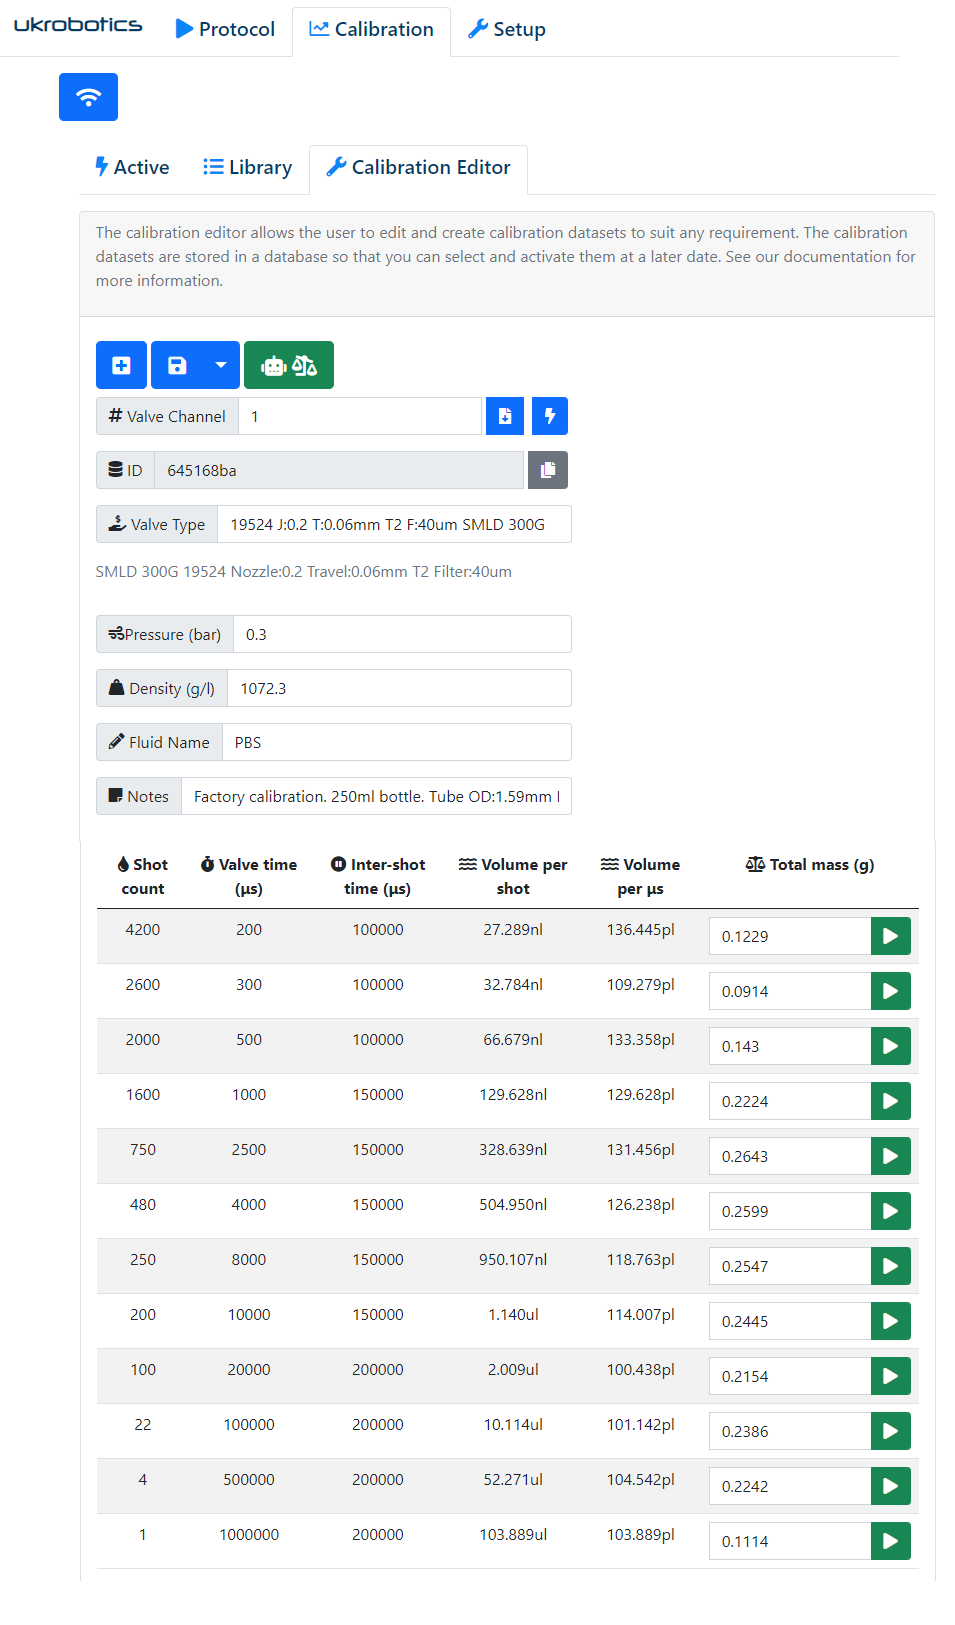
Calibration Editor View
The following image shows the calibration editor tab view:
The top section of this view has the following labelled features and menu:
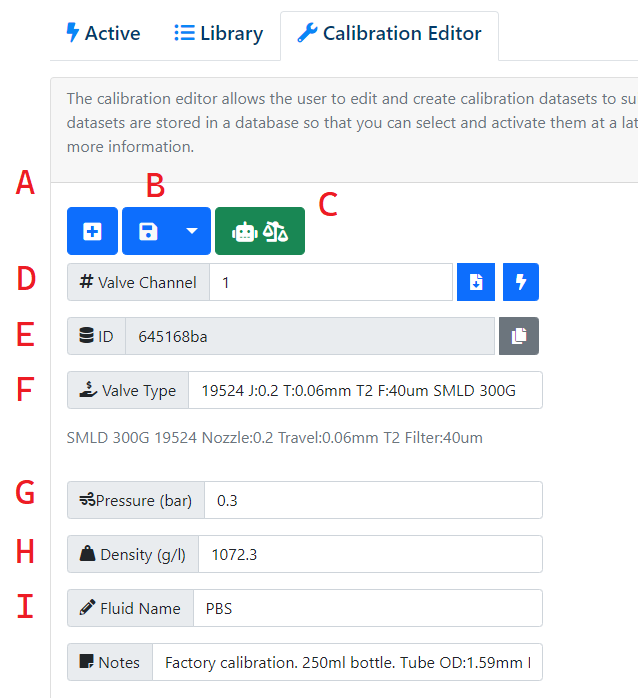
- A - Plus icon, create new empty calibration
- B - Save, import and export CSV
- C - Auto calibration mode - see below for further information
- D - Active valve channel used for calibration - i.e. which channel will be calibrated
- E - The ID, only visible after saving the new calibration
- F - Valve type selected
- G - Dispense pressure
- H - The fluid density - this is very important and will directly affect dispense accuracy!
- I - Textual fluid name and user notes
The following screen shot shows the second half of the calibration editor, this section shows the ‘calibration table’ which contains a table of valve open times against mass which ultimately is used to provide an interpolation table that can map a desired dispense volume into the valve open time which will dispense the desired volume.
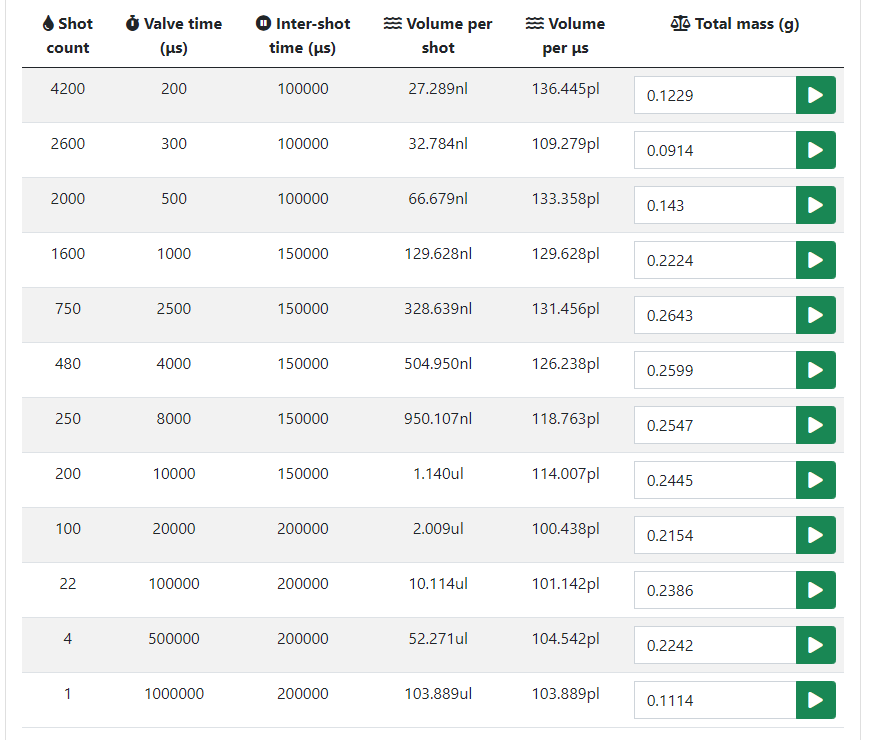
By default, when you create a new/empty calibration table, all the values for the mass and hence the volume-per-shot and volume-per-us will be zero. This is the normal start point for a new calibration table. The D2 will then be used to dispense each row of the calibration table and the dispensed mass will be recorded for each row. When you enter a mass in a row of the table, the software will calculate the volume-per-shot and volume-per-us.
In order to calibrate accurately, the dispensed fluid volumes must be captured, without any splashing and also evaporation must be limited as much as possible. Evaporation can be reduced by use of an oil, such as the common product JOHNSONS® Baby Oil (by J&J). This is a mineral oil made from highly refined petroleum.
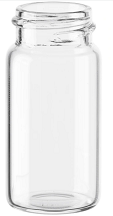
Prefill a small jar as shown below with a little oil. A suggested common jar size is 5ml and 22mm diameter. A screw lid is generally not required.
Before starting the calibration procedure you should flush the fluid lines to push any air out of the fluid channel. Ensure there are no bubbles present and that the fluid is primed fully upto and within the valve.
By hand, move the dispense arms out to a position above the plate nest and place the calibration jar under the valve channel to be calibrated.
Next, use the green “play” button to start the dispensing for this row as shown by the red circle below.
 Note that each row has a defined set of shots and a defined valve open time. Some of the early rows that
will run thousands of shots can take many minutes to run. You will see the LED on the D2 dispense arm flashing
to indicate each valve shot. Once completed, you can remove the jar from the D2 and take the weight of the dispensed
volume and then tare the balance ready for the next dispense line. Enter the mass, in grammes in the input field
next to the green “play”/run button. You will notice the volume-per-shot and volume-per-us will be calculated
as you enter the mass.
Note that each row has a defined set of shots and a defined valve open time. Some of the early rows that
will run thousands of shots can take many minutes to run. You will see the LED on the D2 dispense arm flashing
to indicate each valve shot. Once completed, you can remove the jar from the D2 and take the weight of the dispensed
volume and then tare the balance ready for the next dispense line. Enter the mass, in grammes in the input field
next to the green “play”/run button. You will notice the volume-per-shot and volume-per-us will be calculated
as you enter the mass.
Once you have completed the full sequence, use the save button to save this calibration.
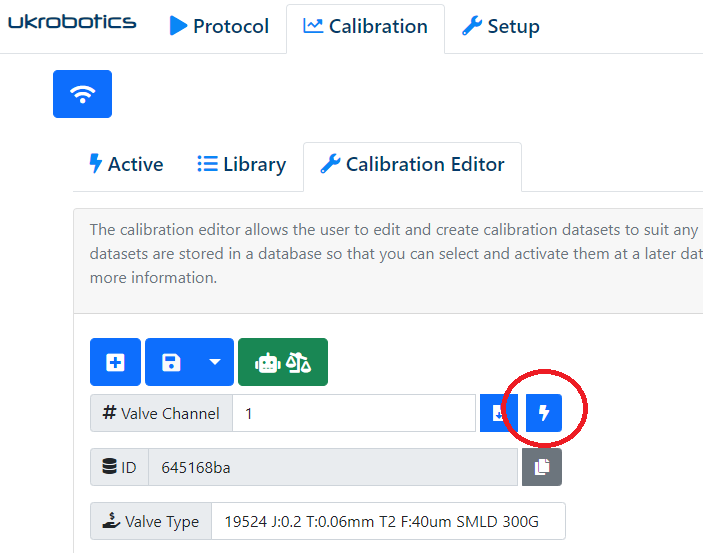
Note that this new calibration will not automatically be set to be active, if you wish to make this
calibration active you can do so easily by pressing the blue botton that is highlighed by a red circle, below:
Balance spec for manual calibration
- Approx max capacity : 200g
- Readability: 0.1mg
Automatic Calibration
In order to save time and reduce human error, D2 can talk to and control a balance which allows for fully automatic calibration.
All that you need to do is to prepare the calibration jar on the balance, position the arms correctly to dispense into the jar, ensure the fluid channels are primed and free from air bubbles, then you can hit run and walk away. The dispense shots will be done automatically together with reading and taring of the balance.
To use the auto calibration feature, you must purchase the following hardware. Your local Mettler Toledo agent or distributor can assist with this purchase:
- Weighing Module WKC204C (Manufacturer: Mettler Toledo, Product# 30248307)
- Y-Cable 12p 1.9m, for communications & power (Manufacturer: Mettler Toledo, Product# 30489564)
- Bench Power Supply XP/XS (Manufacturer: Mettler Toledo, Product# 11107909)
- DB9 Male RS232 to USB by DTech (can be found on Amazon)
The weighing module fits on the left side of D2. Note you can easily hand wind the Z axis to raise the arms and move them so that the valves are above the weighing module and calibration jar. Just as with the manual calibration procedure you should predispense a small amount of mineral oil into the jar which helps to stop splashing and evaporation.
Next, see the screen show below, press the green button that is highlighted with a red circle. The button as the robot and balance icons.
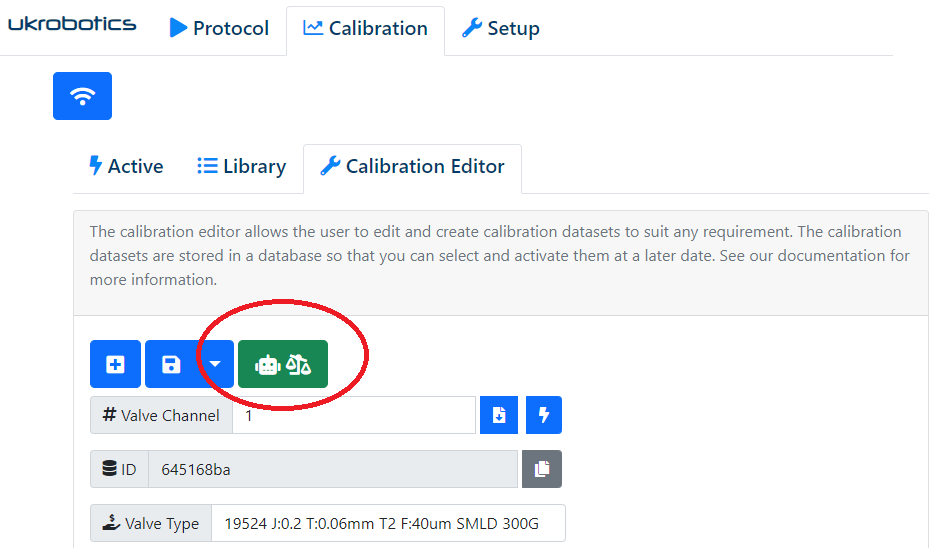
This will show the following dialog box, which allows you to select which rows of the calibration you would like to run.

Note that you can perform a quick/partial auto calibration if you only wish to dispense volumes within a small range.